Dockerizing WordPress for development – intro to Docker
6 min readHey fellas, hope you are all doing good. Things are moving pretty much online these days, we all know social distancing is important, and online is the way to get things done quickly. WordPress has been playing a major role in blogging, providing an amazing platform for content creators and editors. In today’s read, we are going to Dockerize WordPress for development.

Level:
Easy
Prerequisite knowledge:
- WordPress
- PHP
- Apache
- Docker
- MariaDB/MySQL
Context:
- Why dockerize WordPress for development?
- Technology stack
- Folder structure
- Dockerfile
- docker-compose.yaml
- .evn setup
- Github
Why dockerize WordPress for development?
If you have heard and have been using WordPress till date, you know it has played a major in the area of blogging. But WordPress is not only used for blogging! Due to the enormous database of plugins and the customization, it offers it has grown and evolved to a dynamic application. WordPress is lightweight and easy to set up. The best part is – it is open source.
Setting up WordPress is super easy, then why do we need it in a development environment? This writeup is basically for developers who want to set up WordPress on a local development environment and create something new out of it – may be developing a plugin, a theme or even customize it based on your web app requirements.
Docker will help us set up and run the application virtually on our local development environment and also help in shipping the web app on the servers – quick and easy.
Technology stack
To get started, I have picked Apache as the webserver – You may configure it to run on NGINX as well. In this setup, I will be using MariaDB over MySQL due to its advantages.
Folder Structure
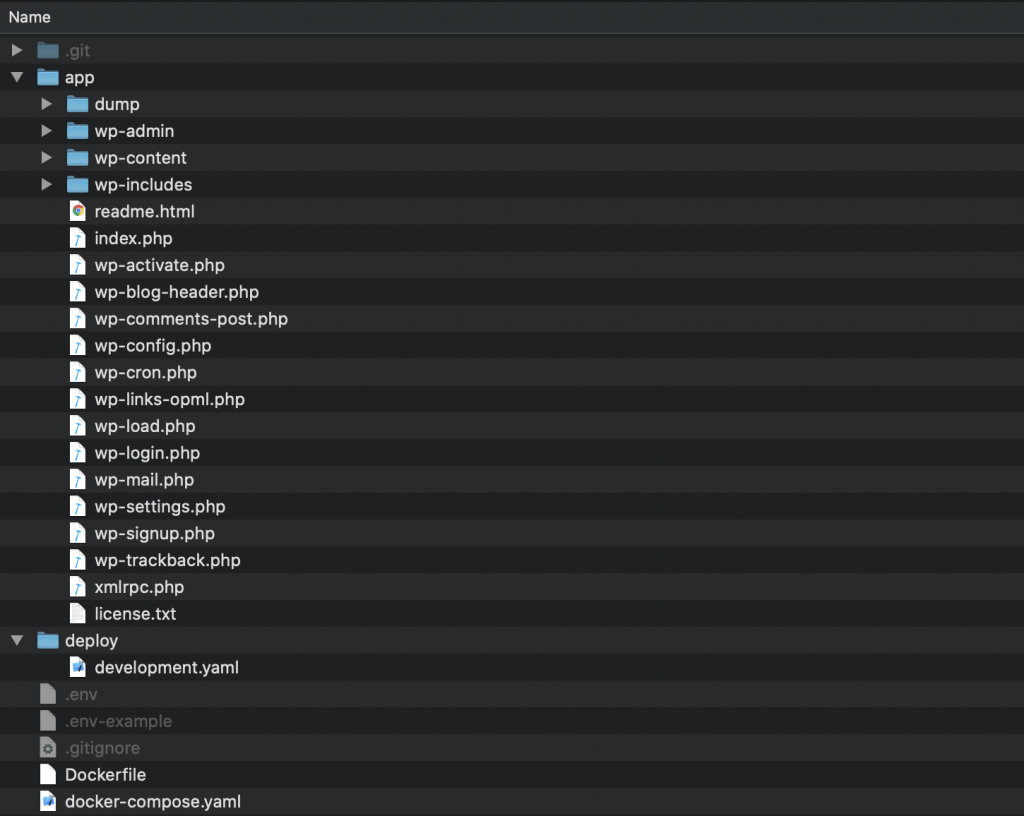
<pre class="wp-block-verse"><span style="font-weight: 400;">./<br></br></span><span style="font-weight: 400;">--- app - The WordPress project<br></br></span><span style="font-weight: 400;">------ wp-config - WordPress configuration file - modified to make use of .env file<br></br></span><span style="font-weight: 400;">--- deploy - deployment folder<br></br></span><span style="font-weight: 400;">------ development.yaml<br></br></span><span style="font-weight: 400;">--- .evn - your application environment variables </span><i><span style="font-weight: 400;">(.gitignore-d)<br></br></span></i><span style="font-weight: 400;">--- .env-example - example structure<br></br></span><span style="font-weight: 400;">--- Dockerfile<br></br></span><span style="font-weight: 400;">--- docker-compose.yaml</span>
Let’s get started!
![]()
Dockerfile
Starting from preexisting PHP, apache image
FROM php:7.2.9-apache
Create a directory on image for your project and copy the content from your .app directory
Creating new working directory and assign permission for web app
# Creating new working directory and assign permission for web app
RUN mkdir -p /var/www/html/
COPY ./app/ /var/www/html/
RUN chmod 755 /var/www/html/
RUN chown -R www-data:www-data /var/www
In this project – we will be connecting to database. Install required extension for php.
# Install extensions
RUN docker-php-ext-install mysqli
Lets see how our complete Dockerfile looks like
FROM php:7.2.9-apache

# Creating new working directory and assign permission for web app
RUN mkdir -p /var/www/html/
COPY ./app/ /var/www/html/
RUN chmod 755 /var/www/html/
RUN chown -R www-data:www-data /var/www

# Install extensions
RUN docker-php-ext-install mysqli
Time to build the image
docker build .
Output: I have removed some configuration setting and unpackaging logs
Sending build context to Docker daemon  289.8MB
Step 1/6 : FROM php:7.2.9-apache
7.2.9-apache: Pulling from library/php
802b00ed6f79: Pull complete
59f5a5a895f8: Pull complete
6898b2dbcfeb: Pull complete
8e0903aaa47e: Pull complete
2961af1e196a: Pull complete
71f7016f79a0: Pull complete
5e1a48e5719c: Pull complete
7ae5291984f3: Pull complete
725b65166f31: Pull complete
3823a607a5d4: Pull complete
1bcfa4198e39: Pull complete
f1c79da21110: Pull complete
18903f439956: Pull complete
5eda25fffde3: Pull complete
3800dac98824: Pull complete
Digest: sha256:42bbbfb881af0d50f8cee436b7645589798e6f17eeec8e63d59239b24d77254c
Status: Downloaded newer image for php:7.2.9-apache
 ---> a52ec7bd06d5
Step 2/6 : RUN mkdir -p /var/www/html/
 ---> Running in 77eae4f33158
Removing intermediate container 77eae4f33158
 ---> dd5087084bc9
Step 3/6 : COPY ./app/ /var/www/html/
 ---> 0dab7227ffaf
Step 4/6 : RUN chmod 755 /var/www/html/
 ---> Running in f1093045feab
Removing intermediate container f1093045feab
 ---> ec31cc4140e9
Step 5/6 : RUN chown -R www-data:www-data /var/www
 ---> Running in a102c2b4a5c4
Removing intermediate container a102c2b4a5c4
 ---> 286881168892
Step 6/6 : RUN docker-php-ext-install mysqli
 ---> Running in a6ecd678600e
<whole setup>
Successfully built fe9ca1ade37a
View the docker image:
docker images

REPOSITORY          TAG                 IMAGE ID            CREATED             SIZE
<none>              <none>              411caa71e9d8        28 minutes ago      521MB
php                 7.2.9-apache        a52ec7bd06d5        20 months ago       378MB
Docker compose
As it says, docker-compose helps you to compose and run a container. To get started – you need to read about docker-compose and install it. I will skip the deep details about it and let you read on it.
Docker compose is basically a three step process
- Dockerfile to define the apps environment
- docker-compose.yaml – service definition and configurations which can run containers together or in isolation.
- docker-compose build AND docker-compose up
- Build and run the entire docker application
Now that we have our Dockerfile ready. Let’s create docker-compose to configure and run it.
docker-compose.yaml
As we had already built our docker image a52ec7bd06d5, we can specify the local image OR your image from DockerHub YOUR_DOCKERHUB_USER/YOUR_IMAGE_NAME.
version: "3"
services:
   app:
       image: a52ec7bd06d5
Althernatively, you can make use of the Dockerfile to build an image.
version: "3"
services:
   app:
       build:
           context: .
           dockerfile: ./Dockerfile
Setting up environment variables
       env_file:
           - ./.env
.env file
WP_DEBUG=true

DB_NAME=wordpress_local
DB_USER=user
DB_PASSWORD=test
DB_HOST=db
DB_TABLE_PREFIX=wp_
It is as per your preference how you set up the environment variables. For my development projects, I personally like to make use of .env file – it keeps the code much cleaner and organised.
Alternatively, you can make use of ENVIRONMENT property
       environment:
	   WP_DEBUG: true
           DB_NAME: wordpress_local
           DB_USER: user
           DB_PASSWORD: test
           DB_HOST: db
           DB_TABLE_PREFIX: wp_
Let’s move further and specify exposed ports, volumes and network.
       ports:
           - "80:80"
       volumes:
           - ./app/:/var/www/html/
       networks:
           - default
That’s it!, lets view our complete docker-compose.yaml
version: "3"
services:
   app:
       build:
           context: .
           dockerfile: ./Dockerfile
       env_file:
           - ./.env
       ports:
           - "80:80"
       volumes:
           - ./app/:/var/www/html/
       networks:
           - default
Now, we can run docker-compose up to create and run our container
docker-compose up

Recreating wordpress_app_1 ... done
Attaching to wordpress_app_1
app_1  | AH00558: apache2: Could not reliably determine the server's fully qualified domain name, using 172.21.0.2. Set the 'ServerName' directive globally to suppress this message
app_1  | AH00558: apache2: Could not reliably determine the server's fully qualified domain name, using 172.21.0.2. Set the 'ServerName' directive globally to suppress this message
app_1  | [Sat May 30 02:28:17.831826 2020] [mpm_prefork:notice] [pid 1] AH00163: Apache/2.4.25 (Debian) PHP/7.2.9 configured -- resuming normal operations
app_1  | [Sat May 30 02:28:17.831994 2020] [core:notice] [pid 1] AH00094: Command line: 'apache2 -D FOREGROUND'
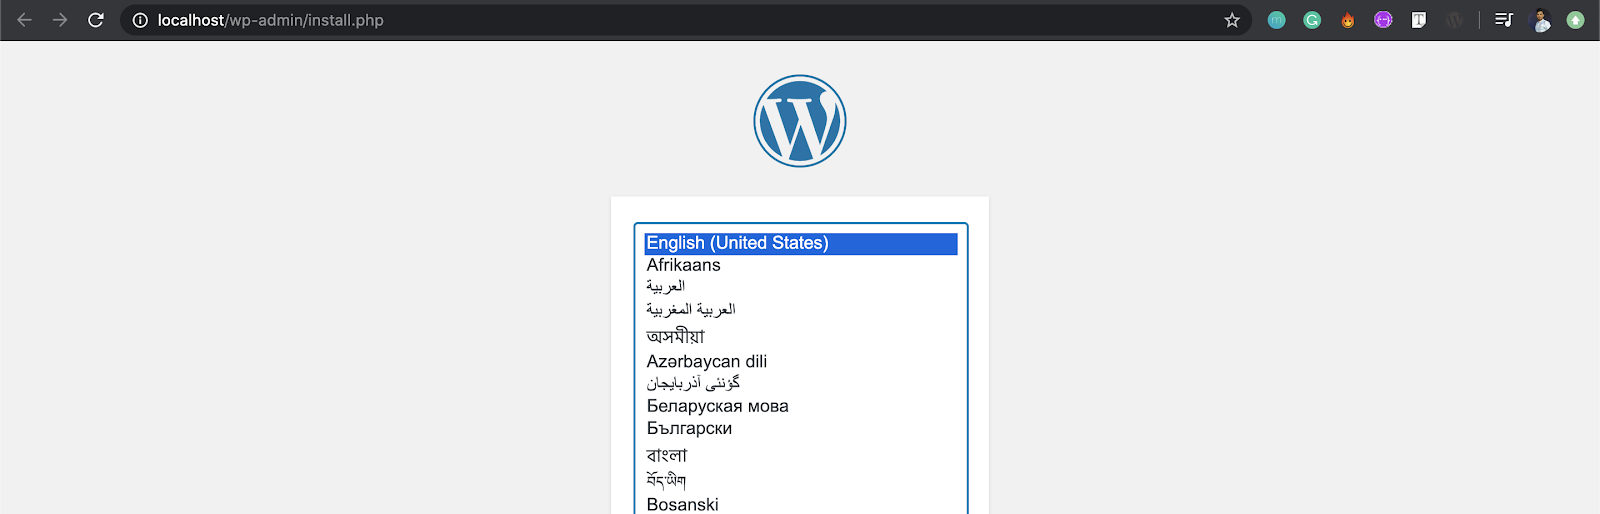
Let’s route http://localhost/readme.html
Perfect!
Database connection
Using MariaDB, we need to set up a database connection on our development system to get WordPress running. I maintain a different set of docker-compose.yaml files for different environments. /deploy folder plays a major role.
For my development environment, I’ve created development.yaml – which will contain MariaDB image and environment variables.
version: "3"
services:
   app:
       build:
           context: .
           dockerfile: ./Dockerfile
       env_file:
           - ./.env
       ports:
           - "80:80"
       volumes:
           - ./app/:/var/www/html/
       links:
           - db
       networks:
           - default
   db:
       image: mariadb
       ports:
           - "3306:3306"
       environment:
           MYSQL_DATABASE: wordpress_local
           MYSQL_USER: user
           MYSQL_PASSWORD: test
           MYSQL_ROOT_PASSWORD: test
           MYSQL_HOST: localhost
           MYSQL_PORT: 3306
       networks:
           - default
We make use of -f parameter for using different container configuration files
docker-compose -f docker-compose.yaml -f deploy/development.yaml up
docker-compose -f docker-compose.yaml -f deploy/development.yaml up

Starting wordpress_db_1 ... done
Recreating wordpress_app_1 ... done
Attaching to wordpress_db_1, wordpress_app_1
db_1   | 2020-05-30 02:38:31+00:00 [Note] [Entrypoint]: Entrypoint script for MySQL Server 1:10.4.13+maria~bionic started.
app_1  | AH00558: apache2: Could not reliably determine the server's fully qualified domain name, using 172.21.0.3. Set the 'ServerName' directive globally to suppress this message
app_1  | AH00558: apache2: Could not reliably determine the server's fully qualified domain name, using 172.21.0.3. Set the 'ServerName' directive globally to suppress this message
db_1   | 2020-05-30 02:38:32+00:00 [Note] [Entrypoint]: Switching to dedicated user 'mysql'
app_1  | [Sat May 30 02:38:32.052805 2020] [mpm_prefork:notice] [pid 1] AH00163: Apache/2.4.25 (Debian) PHP/7.2.9 configured -- resuming normal operations
app_1  | [Sat May 30 02:38:32.052890 2020] [core:notice] [pid 1] AH00094: Command line: 'apache2 -D FOREGROUND'
db_1   | 2020-05-30 02:38:32+00:00 [Note] [Entrypoint]: Entrypoint script for MySQL Server 1:10.4.13+maria~bionic started.
db_1   | 2020-05-30  2:38:32 0 [Note] mysqld (mysqld 10.4.13-MariaDB-1:10.4.13+maria~bionic) starting as process 1 ...
db_1   | 2020-05-30  2:38:32 0 [Note] InnoDB: Using Linux native AIO
db_1   | 2020-05-30  2:38:32 0 [Note] InnoDB: Mutexes and rw_locks use GCC atomic builtins
db_1   | 2020-05-30  2:38:32 0 [Note] InnoDB: Uses event mutexes
db_1   | 2020-05-30  2:38:32 0 [Note] InnoDB: Compressed tables use zlib 1.2.11
db_1   | 2020-05-30  2:38:32 0 [Note] InnoDB: Number of pools: 1
db_1   | 2020-05-30  2:38:32 0 [Note] InnoDB: Using SSE2 crc32 instructions
db_1   | 2020-05-30  2:38:32 0 [Note] mysqld: O_TMPFILE is not supported on /tmp (disabling future attempts)
db_1   | 2020-05-30  2:38:32 0 [Note] InnoDB: Initializing buffer pool, total size = 256M, instances = 1, chunk size = 128M
db_1   | 2020-05-30  2:38:32 0 [Note] InnoDB: Completed initialization of buffer pool
db_1   | 2020-05-30  2:38:32 0 [Note] InnoDB: If the mysqld execution user is authorized, page cleaner thread priority can be changed. See the man page of setpriority().
db_1   | 2020-05-30  2:38:32 0 [Note] InnoDB: 128 out of 128 rollback segments are active.
db_1   | 2020-05-30  2:38:32 0 [Note] InnoDB: Creating shared tablespace for temporary tables
Let’s route to http://localhost to check if database is connected.
Everything looks good!
To run this process in background, we can use of parameter option -d
docker-compose -f docker-compose.yaml -f deploy/development.yaml up -d
Github
Source code link: WordPress fork: https://github.com/prajyotpro/WordPress
Feel free to comment, add improvements and create PR
Stay tuned
Coming up next …
- Deployment of Dockerized image
- Heroku
- AWS/DigitalOcean
- GCP